Easy Origami Easter Lily: Free Template Tutorial
How to make paper Easter Lily flowers, and let me tell you, they are absolutely stunning! Imagine delicate, white petals unfurling gracefully, centered around a vibrant yellow stamen, just like the real thing but made entirely from paper. This project is perfect for anyone, from complete beginners to crafty kids, and it’s a wonderful way to create handmade Easter decorations or thoughtful gifts. You’ll be surprised how quickly you can assemble these, usually within 15-20 minutes per flower. In this tutorial, I’ll guide you step-by-step through each fold, showing you how to achieve that elegant lily shape with our free downloadable template. Get ready to fold some beautiful blooms!
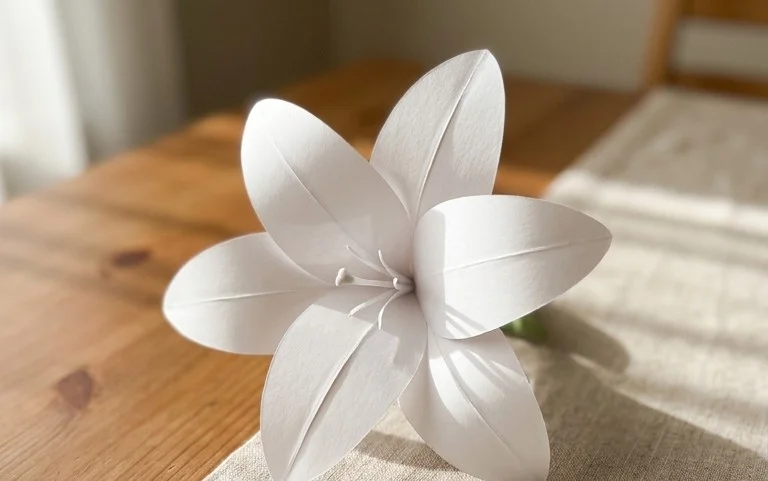
Creating a Beautiful Origami Easter Lily: A Step-by-Step Guide
Hello origami enthusiasts! I’m so excited to guide you through creating a stunning origami Easter Lily. This design is elegant, relatively straightforward once you get the hang of a few key folds, and perfect for bringing a touch of spring into your home or for a heartfelt handmade gift. We’ll be using a free template, which you can easily print at home, and I’ll walk you through every single fold, ensuring a beautiful result. Let’s begin by understanding the best materials to use.
Choosing Your Paper: The Foundation of a Beautiful Lily
The choice of paper is crucial for any origami project, and for our Easter Lily, it influences both the look and the ease of folding.
* **Type of Paper:** For this model, I highly recommend using standard origami paper. It’s specifically designed for folding, meaning it’s strong, thin enough to layer well, and holds creases crisply. Printer paper can work in a pinch, but it’s often thicker and can make the later stages of folding more challenging, especially when you have many layers. Kami paper, the most common type of origami paper, is usually colored on one side and white on the other, which is perfect for our lily.
* **Weight:** Origami paper typically ranges from 60-80 gsm (grams per square meter). This weight is ideal as it’s sturdy enough to maintain the flower’s shape but thin enough to avoid bulkiness in the folds.
* **Size:** The template is designed to be printed on standard letter-sized (8.5 x 11 inches) or A4 paper. The template itself will guide your cuts to create the necessary squares. For beginners, starting with a larger square, perhaps 6 inches or 8 inches (about 15-20 cm), can make the initial folds easier to manage and more precise. Once you’re comfortable, you can experiment with smaller sizes.
* **Single or Double-Sided:** While the template is designed to be printed on single-sided colored paper (with the color on one side and white on the other), you can also use double-sided colored paper. If you use double-sided paper, ensure the colors you want for your lily petals and the center are on opposite sides. For the standard lily, you’ll want the color facing up when you start folding. If you choose patterned paper, ensure the pattern is what you want showing on the outside of the petals.
Mastering the Base Folds: Precision is Key
Before we dive into the lily itself, let’s ensure we’re comfortable with a couple of fundamental origami folds. Making these folds accurately now will make the rest of the process much smoother.
The Valley Fold
A valley fold is the most common fold. Imagine you’re folding a piece of paper in half to create a “V” shape, like a valley. To make a clean valley fold:
1. Bring one edge of the paper precisely to meet another edge or a pre-existing crease.
2. Run your fingernail or a bone folder firmly along the folded edge, from the center outwards. This sharpens the crease and ensures it lies flat.
The Mountain Fold
A mountain fold is the opposite of a valley fold. Imagine folding a piece of paper so the crease sticks *up* like a mountain peak.
1. You often create mountain folds by reversing a valley fold, or by folding the paper away from you.
2. Ensure the crease is sharp and well-defined, just like with a valley fold.
The Squash Fold
This fold might seem a little tricky at first, but it’s essential for many origami models, including our lily.
1. Imagine you have a flap that you’ve folded in half.
2. Open up that flap slightly.
3. Using your fingers, press the edges of the flap inwards, flattening it into a diamond or kite shape. The original crease will now become the center line of your new shape. It’s like taking a triangle and squashing it down.
Your Easter Lily: A Step-by-Step Folding Journey
Now, let’s get our hands on the template. Print it out and carefully cut along the solid lines to get your square. You should have a colored side and a white side.
1. **Start with the colored side facing up.** Fold the square in half diagonally, bringing the bottom right corner to meet the top left corner. Crease well. Unfold.
2. **Now, bring the bottom left corner to meet the top right corner.** Crease well. Unfold. You should now have an “X” crease on your paper.
3. **Flip the paper over so the white side is facing up.** Fold the square in half horizontally, bringing the bottom edge up to meet the top edge. Crease well. Unfold.
4. **Fold the square in half vertically, bringing the left edge to meet the right edge.** Crease well. Unfold. You should now have a “+” crease on this side.
5. **Gently bring the sides of the paper inwards.** The existing creases will help guide you. The left and right edges should meet in the center, and the top and bottom edges will then fold down, collapsing the paper into a smaller square. This is often called a “preliminary base” or “square base.” Ensure all the corners meet precisely and the creases are sharp. You should have a square with four flaps, open at one corner. The open corner will be facing you.
6. **Orient the square base so the open corner is pointing towards you.** Take the top layer of the right flap and fold its right edge to meet the center vertical crease. Crease well.
7. **Repeat with the top layer of the left flap.** Fold its left edge to meet the center vertical crease. Crease well. You will now have a kite shape on the top layer.
8. **Fold the top triangular flap downwards** along the horizontal line formed by the top of the kite shape you just created. Crease well.
9. **Unfold the last three folds** (the two side folds and the top triangle fold). You should now see the creases you’ve made on the top flap.
10. **Now, for a little magic: the petal fold.** Lift the bottom point of the top layer *only*. As you lift, use the creases you just made to guide the paper. The sides will naturally want to fold inwards along those creases. You are essentially opening up the flap and flattening it into a diamond shape. This is a form of the squash fold. Make sure the point you lifted ends up at the top. You should have a diamond shape on the top layer.
11. **Flip the entire model over.**
12. **Repeat steps 6 through 10** on this side. You’ll be folding the right edge of the top flap to the center, the left edge to the center, folding the top triangle down, unfolding these three folds, and then performing the petal fold to create another diamond shape. You should now have a shape that looks like a diamond with two points at the bottom.
13. **Orient the model so the two points are at the bottom.** Take the top layer of the right flap. You’ll see two “legs” at the bottom. Fold the outer edge of the *right* leg to meet the center vertical line. Crease well.
14. **Repeat with the outer edge of the *left* leg** of the same flap. Fold it to meet the center vertical line. Crease well.
15. **Flip the entire model over.**
16. **Repeat steps 13 and 14** on this side. You will again fold the outer edges of both bottom “legs” on this flap to meet the center vertical line.
17. **Now, we prepare the petals.** Take the top layer, right-hand flap. You’ll see a point at the top. We need to create a slit here. Carefully insert your fingernail or a blunt tool (like the tip of a pen) into the very tip of that top flap and make a small slit, about half an inch to an inch long, going downwards. This slit will allow the petal to open later.
18. **Repeat step 17** for the top layer, left-hand flap.
19. **Flip the entire model over.**
20. **Repeat steps 17 and 18** for the two flaps on this side. You should now have four slits at the top of the model.
21. **Gently pull apart the four points at the top of the model.** These will become the petals of your lily. As you pull them apart, the paper will naturally open up.
22. **To shape the petals, curl them gently outwards.** You can use your finger to gently curl the edges of each petal backward to give them a more natural, open lily appearance.
23. **To create the stamen/pistil in the center,** reach inside the flower and gently pull out the small points that are tucked in. You can then carefully curl these points slightly inwards to form the reproductive parts of the lily.
Common Pitfalls and How to Avoid Them
Even experienced folders encounter challenges, and it’s completely normal. Here are a few places beginners often stumble and how to navigate them:
* **Imprecise Base Folds:** The very first steps, creating the square base, are crucial. If your initial diagonal and horizontal/vertical folds aren’t accurate, the subsequent steps won’t align correctly.
* **To Avoid:** Always take your time with these initial folds. Make sure corners meet exactly and crease firmly. Lay the paper flat and align edges before creasing. Don’t rush this stage!
* **Making the Petal Fold Incorrectly:** Step 10 (and 12) involves the petal fold, which can be confusing. It’s easy to accidentally create a different shape or not flatten it properly.
* **To Avoid:** Remember that you are lifting the *bottom point* of the top layer. The existing creases are your guides. Imagine the sides are tucking themselves inwards. If it’s not looking right, gently unfold and re-examine those creases. Press down firmly to flatten the diamond shape completely.
* **Slipping Layers During Folding:** As the paper gets thicker with more folds, it can become slippery. This can lead to misaligned edges.
* **To Avoid:** Hold the paper firmly but gently. Use your non-folding hand to stabilize the layers beneath the one you’re currently folding. Sharp creases also help layers stay in place. If a fold isn’t quite right, don’t be afraid to gently unfold and re-crease.
Personalize Your Easter Lily: Variations to Explore
The beauty of origami is its adaptability! Once you’ve mastered the basic Easter Lily, feel free to experiment:
* **Size:** As mentioned, you can use larger or smaller squares of paper. Larger squares will result in bigger, more dramatic lilies, while smaller ones are perfect for intricate arrangements or garlands.
* **Paper Pattern:** Don’t limit yourself to plain colored paper! Printed origami paper with subtle floral patterns, delicate stripes, or even metallic finishes can add a unique flair. Just be mindful that complex patterns might obscure the crispness of the folds.
* **Color:** The classic Easter Lily is white, but why not have fun with color? Bright pinks, soft lavenders, sunny yellows, or even deep reds can create stunning, non-traditional lilies. You could even use different colors for the inside and outside of the petals if you have double-sided paper with contrasting colors.
Displaying and Gifting Your Handmade Lily
Once your origami Easter Lily is complete, the fun continues with how you present it.
* **Centerpiece:** Create several lilies in varying sizes and colors to form a beautiful centerpiece for your Easter table. Arrange them in a shallow bowl or on a decorative runner.
* **Table Decorations:** Place individual lilies at each setting for your Easter guests. They make lovely, unexpected favors.
* **Gift Topper:** Attach a delicate lily to the top of a gift for an extra special touch.
* **Garlands and Mobiles:** String together multiple lilies to create a festive Easter garland to hang across a mantelpiece or window. You can also hang them from branches to create a charming mobile.
* **Inside a Card:** Carefully flatten a finished lily and place it inside a handmade Easter card. It adds a wonderful three-dimensional element.
* **As a Symbol of Hope:** The lily is a symbol of purity, rebirth, and hope. Presenting your handmade lily as a gift is a thoughtful way to share these sentiments.
I hope you’ve enjoyed creating your origami Easter Lily! Remember, the most important part of origami is to relax, enjoy the process, and be patient with yourself. Happy folding, and a very happy Easter to you!
Conclusion
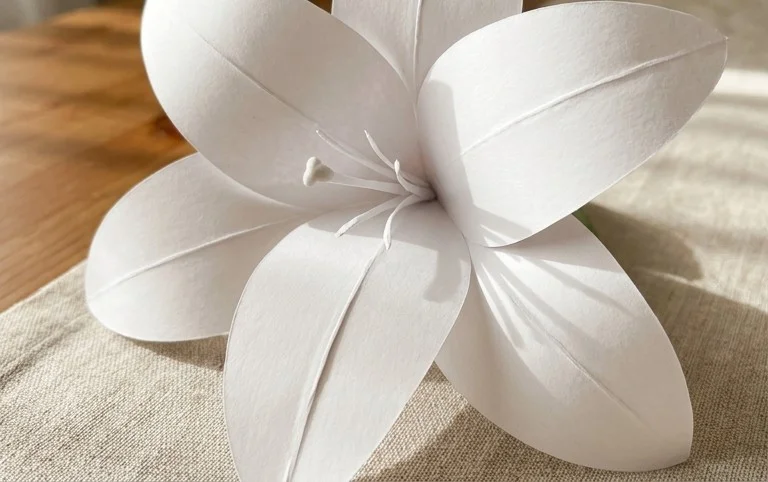
You’ve done it! You’ve brought a beautiful paper Easter Lily to life. Don’t worry if your first attempt isn’t perfect – that’s what practice is for! Each fold helps you get closer to your ideal creation. We hope you enjoyed this origami tutorial and encourage you to share your stunning paper Easter Lily with friends and family.
Ready for more? Try making your Easter Lily in different paper colors, or perhaps try a smaller version for a delicate bouquet. There are so many paper projects waiting for you to discover! Keep folding and creating!
