Easy Origami Forest Animals Cootie Catcher Tutorial for Kids
Forest Animals Cootie Catchers are about to become your new favorite folding adventure! Imagine a super fun, fortune-telling origami creation that opens up to reveal adorable woodland creatures like a sly fox, a wise owl, and a busy squirrel hiding inside. It’s the perfect project for complete beginners and kids of all ages, taking just about 10-15 minutes to create from start to finish. Whether you’re looking for a delightful way to spend an afternoon, a unique party favor, or even a charming little decoration, these cootie catchers are sure to bring smiles. You’ll learn simple folding techniques that are incredibly rewarding, and at the end, you’ll have a playful toy ready for games and storytelling!
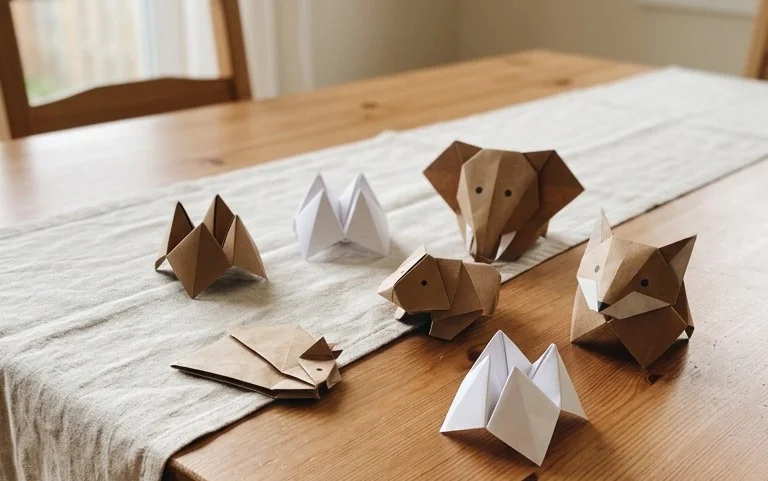
Welcome, origami adventurers! Today, we’re diving into the wonderful world of forest animals with a super fun and easy origami project: Cootie Catchers! These aren’t just any cootie catchers; we’re going to transform them into charming woodland creatures that kids will adore. This project is perfect for little hands and curious minds, and I promise, it’s “easy peasy and fun”! Let’s get started on our paper adventure!
Choosing Your Forest Paper Palace
The first step to any great origami project is selecting the right paper. For our forest animal cootie catchers, we want something that’s easy to fold and looks good.
Paper Type and Weight
For this project, I highly recommend using standard origami paper. It’s thin enough to fold cleanly multiple times, yet strong enough to hold its shape. If you can’t get your hands on origami paper, plain printer paper (around 80gsm) will also work. Avoid cardstock or very thick paper, as it will make the final folds very bulky and difficult to manage, especially for younger children.
Paper Size
The most common and easiest size to work with for cootie catchers is a square piece of paper. A 6-inch by 6-inch (15cm x 15cm) square is ideal for beginners. It’s big enough to fold easily but not so large that it becomes unwieldy. If you’re starting with rectangular paper, like standard printer paper, you’ll need to make it into a square first.
To make a square from a rectangle: Take one of the short edges and fold it diagonally across to meet the opposite long edge, creating a triangle. The excess rectangular strip at the bottom can then be carefully cut off. Unfold the triangle, and you’ll have a perfect square with a crease line.
Single or Double Sided Paper?
This is where the “forest animal” magic happens!
* **Single-Sided Paper:** If you use paper that’s coloured on one side and white on the other, your cootie catcher will have a coloured outer shell. This is great for creating a base colour for your forest. You can then draw or colour your animals on the white inner flaps later.
* **Double-Sided Paper:** If you have paper that’s coloured on both sides, this can lead to even more vibrant results! You could have different colours showing on the outside and inside. Even better, you can find origami paper with patterns on it – think subtle wood grain, leaves, or even a gentle forest scene. This will add an instant touch of nature to your cootie catcher.
I personally love using paper with a different colour on each side for a bit of contrast, but any of these options will create a wonderful forest friend!
The Foundation: Base Folds for Our Forest Friends
Before we bring our animals to life, we need to build the basic structure of the cootie catcher. These are the fundamental folds that will form our fortune teller. Making these folds crisp and accurate is key to a successful outcome.
Let’s imagine we have our square piece of paper in front of us.
The First Fold: The Diagonal Crease
1. Hold your square paper with one corner pointing towards you, like a diamond.
2. Take the bottom corner and fold it up to meet the top corner exactly.
3. Press down firmly along the folded edge to create a sharp crease.
4. Unfold the paper. You should now have a diagonal crease running from the top corner to the bottom corner.
The Second Fold: The Other Diagonal Crease
1. Now, rotate your paper so it’s a square again, with the crease you just made running vertically.
2. Take the left corner and fold it over to meet the right corner exactly.
3. Again, press down firmly along the folded edge to create a sharp crease.
4. Unfold the paper. You should now have two diagonal creases that cross in the center of your square, like an “X”.
The Third Fold: Folding to the Center
1. Turn your paper over so the coloured side is facing down (if you’re using single-sided paper).
2. Take one of the corners (let’s say the bottom one) and fold it inwards so that the tip of the corner meets the exact center point where your two creases intersect.
3. Press down firmly along this new edge to create a crease.
4. Repeat this process for the other three corners. Take the top corner and fold it to the center, then the left corner to the center, and finally the right corner to the center.
When you’ve finished this step, your paper should look like a smaller square, with four triangular flaps pointing inwards.
The Fourth Fold: Folding Again to the Center
1. Now, turn the paper over again. You should see a smaller square shape.
2. Take one of the corners of this smaller square (let’s pick the bottom one again) and fold it inwards so that the tip of the corner meets the exact center point of the square.
3. Press down firmly along this edge to create a crease.
4. Repeat this for the other three corners, folding each one into the center.
At this point, you should have a smaller square, and on the back of this square, you’ll see four square flaps.
The Final Fold: Bringing it All Together
1. Now, turn the paper over one more time. You should see four smaller square sections.
2. Gently slide your thumbs and index fingers into the four pockets created by the folded flaps.
3. Bring your fingers together, pushing the sides of the cootie catcher towards the center.
4. Gently push the paper up and outwards. You should see the four points of the cootie catcher emerge.
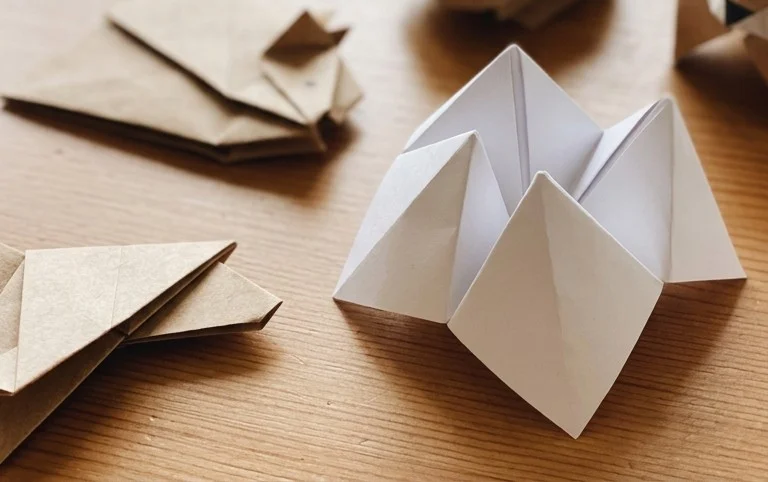
5. Shape it into the classic cootie catcher form, where you can pinch the sides to make the opening and closing motion.
Congratulations! You’ve made the basic cootie catcher shape. This is the foundation upon which our forest creatures will dwell.
The Fold Sequence: Bringing Our Forest Animals to Life
Now for the fun part – turning this basic shape into a delightful forest animal cootie catcher! We’ll be drawing and writing on the flaps.
Let’s assume we’re using paper that’s coloured on one side and white on the other. The white side is currently facing up, with the four smaller squares.
1. **Decorate the Outer Four Flaps (These are the coloured flaps you see when it’s closed):**
* On the inside of each of these four flaps, draw or colour a simple forest animal. Think a bear, a fox, a deer, a rabbit, a squirrel, an owl, a hedgehog… whatever comes to mind! Give them friendly faces.
* Around each animal, you can draw some forest elements like leaves, acorns, or mushrooms.
2. **Decorate the Inner Eight Sections (These are the white sections you see when you open it up):**
* We have four flaps on the outside, and when you open them, you reveal another set of flaps. These are the inner sections.
* On these inner flaps, you’ll write the numbers or the “options” for the cootie catcher. For a forest theme, I like to use numbers.
* On each of the eight inner flaps, write a number. You can repeat numbers, or use 1-8.
* Now, open up the cootie catcher so you can see the coloured flaps with your animals. Beneath each coloured flap, you’ll see a white flap with a number.
* Underneath these numbers, there are spaces for the final messages or “cootie catcher fortunes”. You can write simple forest-themed phrases like:
* “You found a friendly badger!”
* “A wise owl hoots hello!”
* “Watch out for a mischievous squirrel!”
* “Enjoy the peaceful forest.”
* “A deer leaps gracefully!”
* “It’s a happy little hedgehog.”
* “You’re a forest friend!”
* “Roar like a bear!”
* **Colouring the Numbers:** On the outside, where you have your animal flaps, you’ll see the coloured paper. On these, in the centre of each coloured flap, write a number that corresponds to one of the options on the inside. For example, if you have four coloured flaps, you might write the numbers 1, 2, 3, and 4 on them, and then have those numbers on the inside flaps. You can also colour the points of the cootie catcher with different colours and associate those colours with the numbers inside.
**How to Play (Briefly):**
The child chooses a colour or a number on the outside. You open and close the cootie catcher based on the number of letters in the chosen word (or the number selected). This continues until they pick a final number. Then, they open that flap to reveal their forest friend’s message!
Common Pitfalls and How to Avoid Them
Even with an easy project, it’s common to run into a few snags. Here are some places beginners often go wrong and how to make sure your cootie catcher is perfect.
* **Messy Creases:**
* **The Problem:** If your folds aren’t sharp and precise, the cootie catcher can become bulky and difficult to manipulate. The corners might not align properly.
* **How to Avoid:** Always press down firmly along the entire length of the fold with your fingernail or a bone folder if you have one. Ensure that corners meet edges precisely before creasing. Take your time with these base folds; they are the most important!
* **Misaligned Corners in the Center Folds:**
* **The Problem:** When folding the corners into the center (steps 3 and 4 of the base folds), if the corners don’t meet the exact center point, the final shape will be skewed and uneven.
* **How to Avoid:** Look for the intersection of the diagonal creases you made first. This is your target center point. For step 3, where you have the coloured side down, fold each corner tip precisely to that central intersection. For step 4, where you have the white side down, do the same – fold each corner tip to the center.
* **Not Understanding the Pockets for the Final Fold:**
* **The Problem:** When it’s time to bring the cootie catcher together (step 5 of the base folds), if you’re not sure where your fingers go, you might struggle.
* **How to Avoid:** After step 4 of the base folds, you have a small square with four flaps on the back. Gently slide your thumbs *under* two opposite flaps, and your index fingers *under* the other two opposite flaps. Imagine you’re giving the cootie catcher a little hug with your fingers inside. Then, gently bring your fingers together.
## Varying Your Forest Friends
The beauty of origami is its adaptability! Here are some ways to make your forest animal cootie catchers even more unique.
Paper Patterns and Colours
* **Themed Paper:** Look for origami paper with nature-inspired patterns. This could be subtle leaf prints, wood grain textures, or even watercolour washes that evoke a forest atmosphere.
* **Colour Combinations:** Experiment with different colour combinations for the inside and outside. A brown outside with green inside, or a sunny yellow outside with earthy brown inside, can all suggest different forest moods.
* **Solid Colours:** Don’t underestimate the power of solid colours! A vibrant green cootie catcher can represent lush foliage, while a sky blue can suggest a clear forest canopy.
Size Matters!
* **Larger Paper:** If you use a larger square of paper (e.g., 8-inch or 10-inch squares), your cootie catcher will be bigger. This makes it easier to draw more detailed animals and write longer messages inside. It’s also often easier for younger children to manipulate larger folds.
* **Smaller Paper:** For a more intricate and delicate feel, try using smaller squares (e.g., 4-inch squares). These make adorable little keepsakes, perfect for party favours or to tuck into a greeting card.
Animal Variations
* **More Creatures:** The forest is full of life! Think about adding a frog, a snail, a spider, or even a friendly worm to your animal collection.
* **Abstract Forest Elements:** Instead of specific animals, you could draw trees, mushrooms, flowers, or berries on the flaps.
* **Character Personalities:** Give your animals unique personalities! One bear could be sleepy, another playful. A fox could be sly, another curious.
Displaying and Gifting Your Forest Treasures
Once your forest animal cootie catchers are complete, they’re not just for playing with! They make wonderful little gifts and decorations.
Gift Ideas
* **Party Favors:** Make a batch of these for a forest-themed birthday party. Kids will love taking one home as a souvenir.
* **Small Gifts:** Tuck one into a birthday card, a “thinking of you” note, or even as a small prize for good behaviour.
* **Classroom Activity:** This is a fantastic activity for a classroom setting, especially during autumn or when learning about woodland creatures.
* **DIY Kits:** Put together a little kit with pre-cut paper squares, instructions, and maybe some coloured pencils, and give it as a creative gift.
Display Ideas
* **Mobile:** String several cootie catchers together with colourful yarn or ribbon to create a whimsical mobile that can hang in a child’s room.
* **Garland:** Connect them end-to-end to make a festive garland for a special occasion or just to brighten up a space.
* **Bulletin Board Decoration:** If you’re a teacher, these make fantastic decorations for a classroom bulletin board related to nature or reading.
* **Desk Buddies:** Simply leave them on a desk or shelf as cheerful little reminders of the fun you had making them.
I hope you’ve had as much fun making these forest animal cootie catchers as I have! They are a delightful way to combine crafting, creativity, and imaginative play. Remember, practice makes perfect, so don’t worry if your first few aren’t absolutely flawless. The most important thing is to enjoy the process and the wonderful woodland creatures you bring to life! Happy folding!
Conclusion
We hope you had a fantastic time creating these adorable forest animals cootie catchers! Don’t worry if your first one isn’t perfect – every fold is practice, and the joy is in the making. Feel proud of your creation and share your playful animal friends with family and friends! For a new challenge, try folding a different origami animal next, or perhaps a paper airplane. There are so many more exciting paper adventures waiting for you. Keep folding and exploring!